- How to Setup Your Virtual Booth
NCN Presenter Access Email
- Look out for your NCN Presenter Access: Action Required email.
- For future logins, bookmark app.swapcard.com/event/ncn.
- The Magic link is only valid for 24 hours. Please open the email ASAP or you will need to request a new Magic link.
How to Navigate the Exhibitor Center
- Home: The home button provides a Welcome message from the show organizer. Once the event is LIVE, you can click ‘Home’ to view detailed analytics of your company profile page (including page views, contacts made, bookmarks and numbers of confirmed meetings).
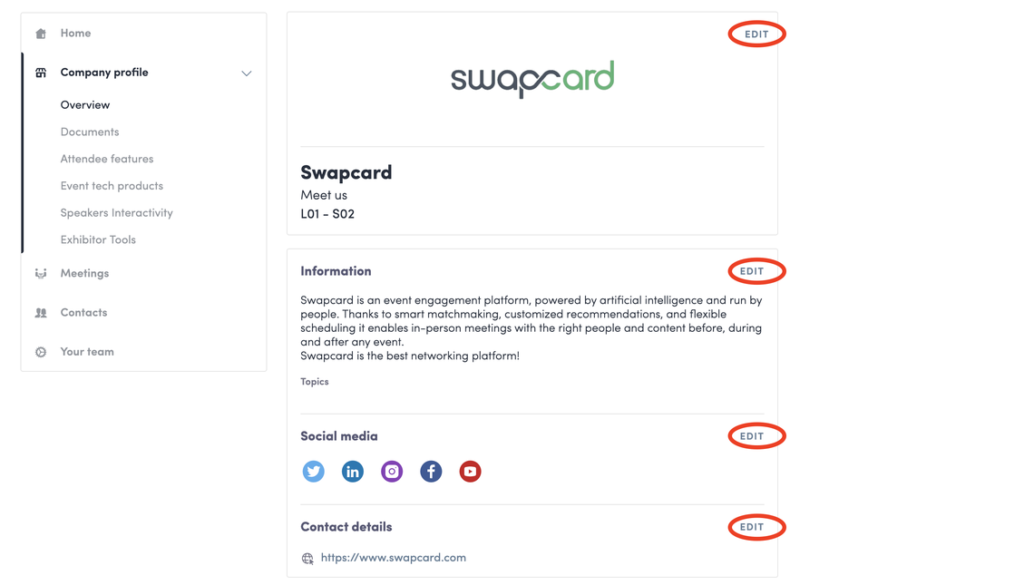
- Company Profile: The Company Profile drop down is the main area to view and edit your company information. You can upload your logo, marketing materials product assets, links to social media and more. Click the ‘edit’ button to bring up options for each section of your virtual booth.
- Meetings: The Meetings button allows you to confirm, cancel and decline meeting requests from attendees. You can also export a list of your meetings to Excel.
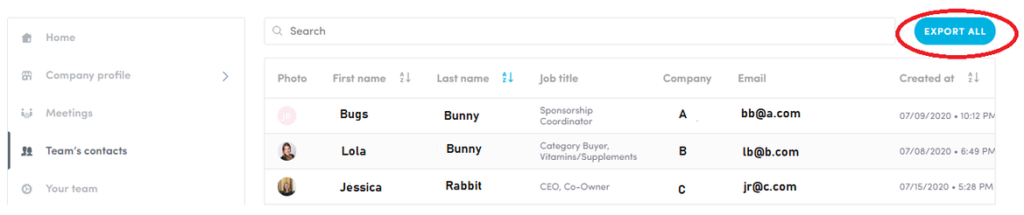
- Contacts: Contacts is where you can view, sort and export all contacts made by your team before, during and after the event.
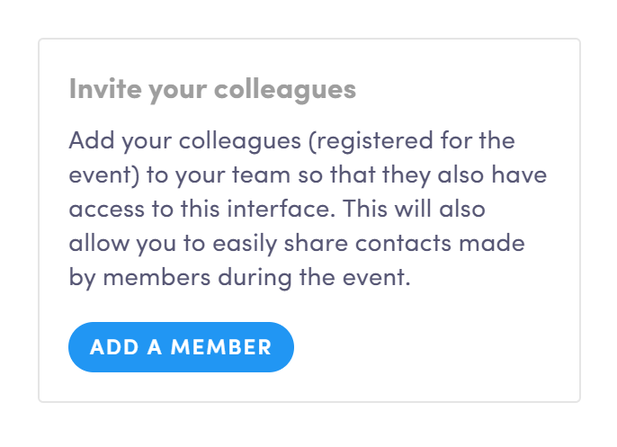
- Your Team: Your colleagues must register for the NCN event before they can be added to the team. When added, click on a team member to edit their settings.
How to Edit Your Exhibitor Profile
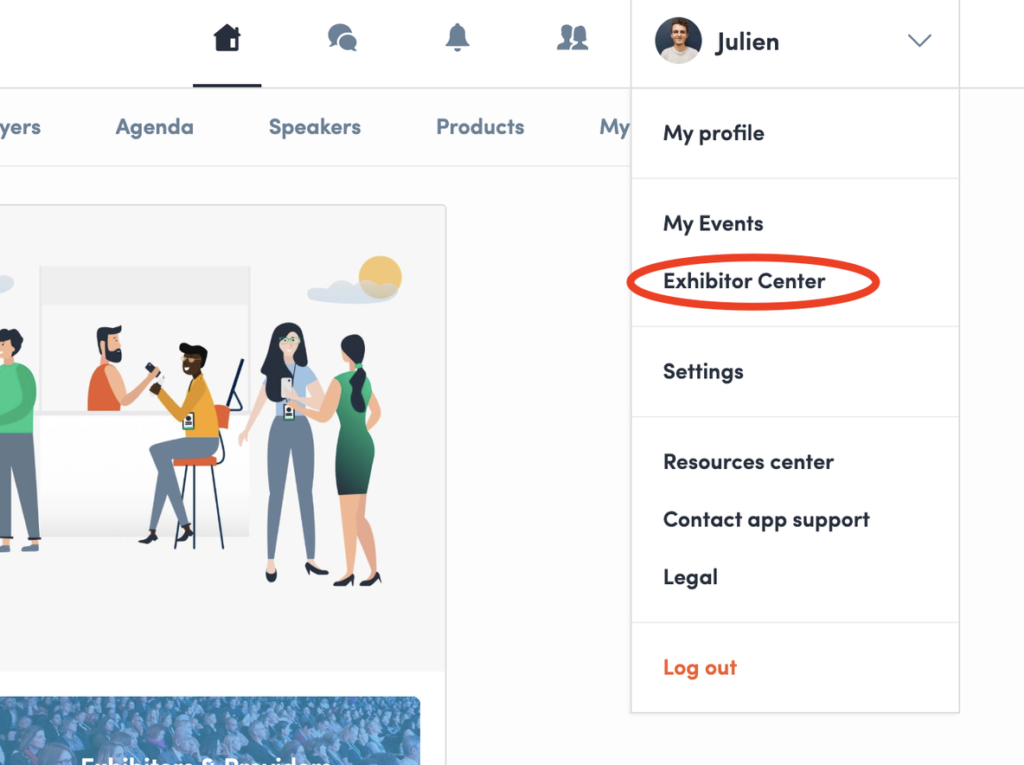
- From your computer, go to your “Exhibitor Center” under menu drop down in top right corner.
- Once, in Exhibitor Center, click on “Company profile” in the left side menu.
- To add or modify information, click on the “Edit” button in front of the section of your choice.
Updating Your Company Profile Header Banner
- Upload a custom designed header banner to your profile. We recommend using a 1200x675px (16:9 ratio) image, no larger than 1MB.
- Or upload a custom designed video! First upload it to YouTube or Vimeo then copy and paste the link into the Video ID bar.
How to Add Documents
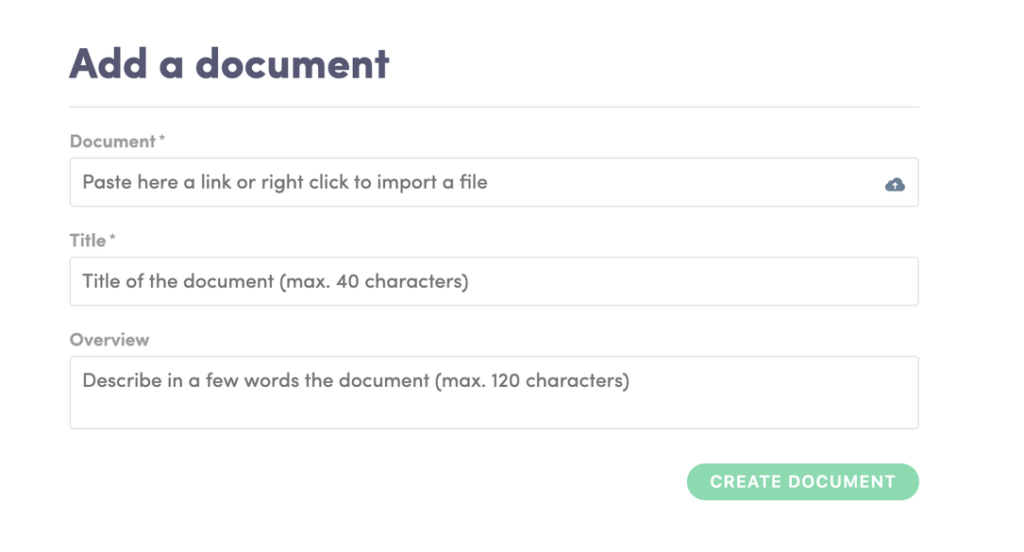
- From the Exhibitor Center select the Company Profile drop down
and choose ‘Documents’. - Click on ‘Add Your Documents’ on the right of the screen.
- You can either paste a link or upload a document. To upload a document click on the cloud to import a file from your computer.
- Give your Link or Document a title (mandatory) and an overview (optional). Please note the maximum number of characters for each field: 80MAX for title, 160MAX for overview.
How to Add Additional Videos or Media Assets
Add additional videos or media assets to highlight products, promotions, testimonials and more. Go to Company Profile in your virtual booth and find the “Promotional Media” section. Choose the header most appropriate for asset and insert link!
How to Add Products & Services
- From the Exhibitor Center select the Company Profile drop down and choose ‘Products & Services’.
- To add a new Product or Service click on ‘add’ at the top right of the screen.
- Choose a Category and a Sub Category from the drop downs. Please note once a Product or Service is created you cannot edit either category or sub category, so it is important to choose carefully.
- Add a name (mandatory) and a description (optional) to the Product or Service. Then click ‘Create’. Once you click ‘Create’ the Product & Service will immediately appear on your Company Profile.
- Next the editing window will appear so you can add an image (marketing display or label flat), edit the name and description, add a link and other attributes of the Product or Service. To submit these additions just click anywhere outside of the editing window.
- Now all of your Products or Services will be visible from your Company Profile.
Please note: product images work best with 1:1 ratio, height and width. If the photo you upload is not square, we suggest adding your image to a white square background to ensure your full image is displayed.
To keep the compliance quality and integrity of your product presentations, the New Hope Network Standards Department will be reviewing your product labeling and marketing as we do at all Natural Products Expo events. Please contact [email protected] if you have any questions regarding the Expo Standards.

Standards
The purpose of the New Hope Network’s Exhibitor Standards is to help define and safeguard the natural & organic products industry, support industry self-regulation, create a high-quality event and foster the responsible growth of our industry. We present these standards in a spirit of cooperation with current industry efforts to ensure quality and integrity, and to protect our clients from the risks of legal and regulatory actions with U.S. federal agencies such as the U.S. Food & Drug Administration and the U.S. Federal Trade Commission. We believe these standards will increase consumer confidence in products promoted at our events, in our publications, and on our Internet sites. All Natural Products event contracts include Informa terms & conditions which require compliance with these Standards.Please contact [email protected] if you have any questions.How to Add Your Team Members
- Make sure all of your colleagues have registered in advance for the NCN event.
- Once they have registered they will receive the NCN Presenter Access email from [email protected]. The Presenter Access email must be opened within 24 hours of receipt in order to access the event and create their account.
- Colleagues with active accounts can now be added as team members to the Company Profile.
Please note that you cannot remove team members from your Company Profile once added. Please contact Robert Decker at [email protected] if you need assistance.
How to Switch to the Event View
When you have finished making changes to your Exhibitor Center, you must click “Switch to the Event” to return to the NCN event…

- How to Enhance Your Virtual Booth
If this is your first virtual booth, where do you start?
Stand Out From the Crowd
Chances are there will be other virtual booths and elements at the event which means that your job is to figure out how to separate your booth from the crowd. Think of something outside the box.What content should you add?
Think of your profile video as the place to feature your voice! This is your theme, your design, your voice...make it inspire others!
Focus on your Top Products or Services that you want to highlight for this audience.
Don't forget to include important documents like your sales sheets or press releases, and add links to showcase your brand story!
- How to Network in NCN Virtual Platform
How to Navigate NCN Virtual Platform
We know that this is likely the first time you’ll be interacting within Swapcard. Check out this quick video and learn how to navigate the platform and make the most out of your time within the NCN Virtual Platform.
How to Connect with Others
- You can explore participants through the “People” tab.
- There are 2 ways to find individuals to connect with.
- Search for a specific individual by typing their name, title or company into the search bar on the left-hand side.
- Add keywords and criteria on the left-hand side to inform the matchmaking algorithm that suggests people you should meet!
- Click on the name of the individual you want to connect with to see their profile and meeting availability.
- We encourage you to write a message before sending your connection request to introduce yourself and explain the reason you’re looking to connect.
- Click “Send Connection Request.”
How to Filter Your People Search
How to Ask for a Meeting
- You can find participants through the “People” tab.
- On the left-hand side, use the criteria filter to specify the position of the individuals you want to meet with.
- Click on the name of the individual you want to meet with to see their profile and meeting availability.
- Click on one of the proposed meeting slots.
- After selecting a time slot, you’ll be able to write a message to the person you want to meet. Let them know why you’re interested in speaking more with them!
- Click “Send Meeting Request.”
- You will be redirected back to that person’s profile and will see that your meeting request is pending.
Understanding How to Manage Your Meetings
Here are some quick meeting FAQ’s for more comprehensive instructions here in the Swapcard Knowledge Base.
- How to assign a meeting to a specific team member: To assign a meeting to a member of your team, simply go to the ‘Meetings’ section of your Exhibitor Center then click on the meeting of your choice: select the collaborator of your choice by typing the first letters of his first name in the field ‘Please assign a member to this meeting’, then click on ‘Accept’.
- How to find meetings: In your exhibitor center, you can find all the meetings related to your company.
- Meetings can appear under different categories:
- Invitation: received meeting request to which you must reply
- Confirmed: meeting request accepted
- Waiting: meeting request sent by a member, waiting for an answer
- Canceled: meeting cancelled
- Declined: meeting request declined
- How to answer a meeting request: Participants in an event can request meetings with exhibitors. When you receive a meeting request, you have the option to accept or decline it. All requests received appear in your Exhibitor Area, in the ‘Meetings’ tab.
- How-to export my meetings: You can export the meetings to an Excel file. To do this, click on the ‘Export meetings’ button on the “Meetings” tab.
Meeting people is at the center of the NCN Community! To find out more about how to assign certain team members to a meeting, manage your availability, respond to meeting requests and more, check out this video!
How to Pull Your Leads
For your company:
- Click the name of your company under your name on the left-hand side.
- Using the menu on the left-hand side, click “Team’s Contacts.”
- Click “Export All” in the top right-hand corner and wait for the Excel file to download.
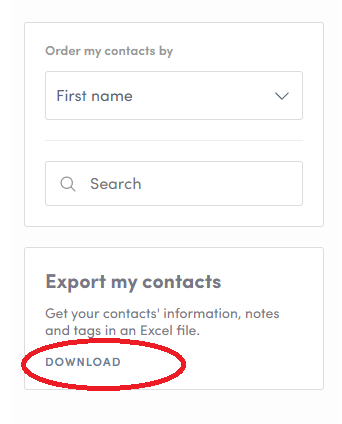
For your personal profile:
- In the top right-hand corner of the home screen, directly to the left of your name, click on

- On the left-hand side click on “Download” in the “Export My Contacts” section
How to Increase ROI
Swapcard offers so many ways to improve the quality of your interactions within the platform to get the absolute most out of your time and investment.
Check out this link for best practices to increase your ROI before, during and after the event.
How Matchmaking Works
The more you interact within the platform, i.e., the more members you add to your team, the more in-depth you go into on your own profile and your company’s profile, the more you will match with your target audience!
Check out this PDF for specifics on how Swapcard’s artificial intelligence works and hot to get the most out of it.
